但是自从几天前 Picasa Web 被完全屏蔽,问题就来了。浏览器查看 Picasa Web 倒还好说,翻墙就是了,反正我基本上是24小时连线 VPN 的,在 Google Chrome 上再通过 Proxy Switchy! 插件管理 Proxy 翻墙也很方便。困难的是 Picasa client 居然没有 Proxy 的设定,这可如何是好。要知道我是天天需要上传宸宸的照片的。尽管可以通过 Picasa Web 上传,但是需要一张张慢慢来,而且通过 Picasa client 可以直接 resize 照片,以节省 Picasa Web 空间。所以说 Picasa client 上传还是有必要的。
前两天,Picasa client 不断尝试登录,偶尔还是能够成功的,上传照片的时候有时也需要不断重试,但总算可以完成任务。但是今天不对了,always 登录失败,而且错误信息很妖怪。回头看看《How to make Picasa work with proxy》,发现不知所谓。头痛啊!
折腾了半天终于给我找到了正解。
首先上面的文章一直在说 IE,我又从 Picasa client 的 network.log(位于 C:\Users\foolbear\AppData\Local\Google\Picasa2)发现:
[Log time: 8 Apr 2010 21:25:13 +0800]其中 wininet.dll 真是 IE 提供的一个 COM 组件(WinInet.dll is the protocol handler for HTTP, HTTPS and FTP. It handles all network communication over these protocols.)。由此可见 Picasa client 使用的是 IE 的 Porxy 设定。
wininet.dll version: 8.0.7600.16535
Log level 2, log faces 0
Picasa3 version 105.41
[0] Proxy information for connection: **-VPN
Using direct connection
[31] Proxy information for default connection:
Proxy config url: file://C:/Users/foolbear/AppData/Local/Google/Chrome/User%20Data/Default/Extensions/caehdcpeofiiigpdhbabniblemipncjj/SwitchyAuto.pac?1270732643264
由于平时都是用 Google Chrome 的,倒是没有注意 IE 的情况。按说 Google Chrome 的 Proxy 设定(位于 C:\Users\foolbear\AppData\Local\Google\Chrome\User Data\Default\Extensions\caehdcpeofiiigpdhbabniblemipncjj\SwitchyAuto.pac)是和 IE 共用的,然而 IE 去不能翻墙。
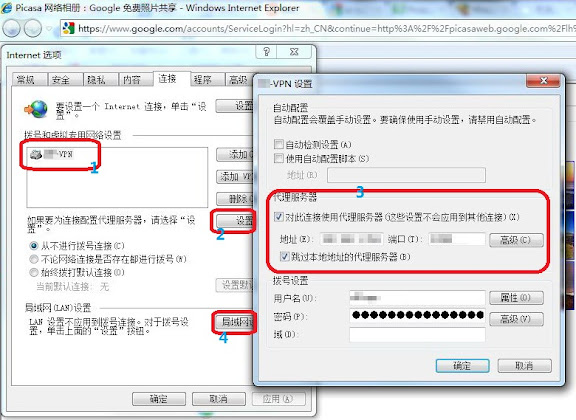
经研究发现,在 VPN+Proxy 的状况下,IE 的 Proxy 设定位于“工具 - Internet 选项 - 连接”,在“拨号和虚拟专用网络设置”列表中选中所需 VPN,点击右下“设置”,在 VPN 设置中设定“代理服务器”。操作按照下图 1-2-3 指示:
上述设定完毕,IE 可以翻墙访问了,回到 Picasa client,也可以正常登录并上传照片了,流量通过该 VPN。我们再看 Picasa client 的 network.log 如下:
[Log time: 8 Apr 2010 22:30:16 +0800]可以看到该 VPN connection 的 Proxy 设定成功了。
wininet.dll version: 8.0.7600.16535
Log level 2, log faces 0
Picasa3 version 105.41
[0] Proxy information for connection: **-VPN
Manual proxy: 192.168.***.***:*******
Bypass urls:
[32] Proxy information for default connection:
Proxy config url: file://C:/Users/foolbear/AppData/Local/Google/Chrome/User%20Data/Default/Extensions/caehdcpeofiiigpdhbabniblemipncjj/SwitchyAuto.pac?1270732643264
回头我们再看看 IE 设定 Proxy 的过程,在 VPN 状况下如上所示,而直接连外网 Proxy,就只需要在上图 4 指示的“局域网设置”即可。这都可以说的通的。文章《如何在 Internet Explorer 浏览器中设置代理服务器》对这两种情况下的 Proxy 设定过程做了详尽的介绍。
不过我有个疑问:为什么 Google Chrome 在 VPN+Proxy 的状况下,只需要做“局域网设置”就可以了呢?至少 Proxy Switchy! 插件只动了这个设定。Google Chrome 的 Proxy 设定不是和 IE 共用的么?why???


1 条评论 :
T娘提供一个 Picasa3 Client 的修改版本,修改了上传网址来恢复上传功能。有需要的朋友可以试试:http://code.google.com/p/ariagle-code/downloads/list。
发表评论